Hello there friends! Happy Sunday to all of you. I’m so thrilled to say now that it’s officially February I can throw myself into Valentine projects with reckless abandon.
For today’s project I created a very vintagy inspired wall hanging…..
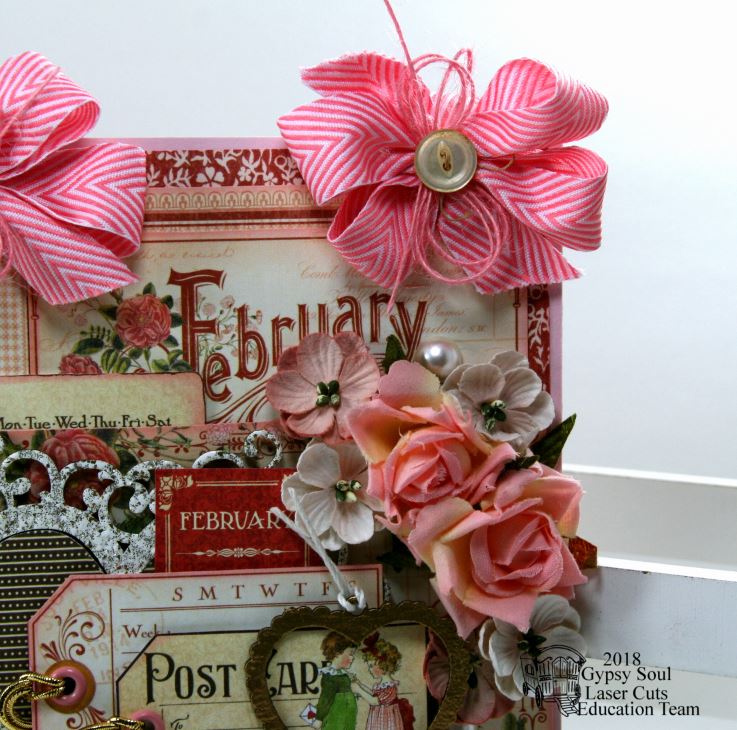
Isn’t it just loverly? So many layers!!!!!!
I’ve layered the chipboard.
I’ve even layered the bows.
And topped it all off with layered flowers.
But not even I am expert enough to layer pearls : (
Won’t you join me for a video tutorial on how I created this project……
Happy Thursday Peeps! It’s officially February now so it’s okay that I’m a little crazy about Valentines. Like I would have my entire house draped in hearts and flowers and treats everywhere. Sadly I live in the house of boys so they would not appreciate balloons and confetti everywhere right?
I can however create pockets and fill them with sweet little tags…..
Isn’t this super retrolicious?????? This is the Forever My Always Collection from Pebbles.
Even without the tags it’s pretty dang cute. Anddddd there’s room in the pocket for treats!
Coordinating tags to fill the pocket. I love tags. Like a lot.
Hey there Peeps. It’s kit day. This makes me all kinds of happy!!!! I do so love a kit. All the little bits and pieces with so much potential. You all know I get a kit for myself to play with….because I can’t not get in on the action.
Hey guys just a quick post today. I’m sharing a sweet little country chic inspired greeting card created with Plaid Flower Tags Digital Collage Sheet from my shop. Please enjoy this video tutorial on how I created the card…..
Hello there Peeps! I’m happy to announce that we have a bit of a warm up here in Michigan. This morning it’s 52 degrees. This does good things for my disposition. I was in such a better mood that I was inspired to throw myself into Valentine projects.
This card has a very untraditional color scheme. I coordinated the papers to the wrap on the cherub. Altered chipboard, flowers, twine, sequins, and metal embellishments are the perfect accents.
A sweet and simple tag has soft colors and vintagy finishing touches. Using spacers between the layers build depth and interest.
The cherub tag on this card inspired the peachy pink colors from the paper patterns. Stickles added sparingly brings out the details on the vintagy image. I layered die cuts here and a rather generously sized flower arrangement.
Please enjoy this video tutorial I’ve created for this card…..
OMGosh Peeps I am super excited today to be sharing the new Retro Valentine Deluxe Creativity Kit 2018. You all know how much I love to create kits and to take one for myself to make projects with. What makes this kit deluxe? It’s got all the fabulous papers and images and bows you’re all used to seeing in the kits created by Polly’s Paper Studio….and it also has loads of extra fun holiday embellies like doilies, tinsel, ric rac, flowers, clothespins, brad, bling strip, and red glittery die cut hearts : ) I am practically giddy.
Here are the projects I created with the kit and a few bits and pieces from my stash…..
I had so much fun creating these 6 projects and I have loads of supplies left from the kit to make at least 2 more.
Please enjoy this video I’ve prepared for the Hey Sugar Valentine Tag….
Hey there all you fabulous friends! Well it’s the second day of the new year and we are still in a deep freeze here in Michigan. The only way to combat the stir crazies I get from being stuck inside is to throw myself into holiday crafting.
I’ve created a sweet and simple Gate Fold Valentine Card with Belly Band. Make sure to scroll to the end of the post for the video tutorial on how I created this card.
I’ve decided on a non traditional color scheme here to coordinate with the holiday bingo card. With the band on you can see that there’s loads of paper layers and die cuts.
Sliding the band off to reveal the gate fold. I used the bingo card to overlap and add extra detail.
The inside is finished with coordinating patterned papers and is so so sweet with the die cut heart doily.
Hey there Peeps! Well as you can see I’m late getting my post up again lol. Blame it on the nog and cookies : ) Or blame it on me sleeping in???? Either way I think it was worth the wait.
I’ve created some really sweet and vintagy New Year’s Greeting cards with the new Dollar Download Vintage New Years Printable from our shop. I like the idea of New Year’s cards for just that holiday….but they come in very handy if you’ve just not gotten out all the Christmas cards….or drat forgot someone on your list and got a card from them ( it happens to all of us) I think this is a good recovery.
Hello there Peeps! Well I’m happy to say that the holiday season is upon us. Sadly that also means that winter is upon us. There is one way to combat the elements and that is with a winter survival box filled with essential supplies to get you through. For today’s project I’m turning that idea into a present by tucking all the supplies into a handcrafted gift box using the Carousel Christmas paper collection. Another great thing about this project is I’m re-purposing a box from the recycling bin hooray!!!
I think this combination of pinks and greens is shabby…but updated and fresh.
I’ve piled on the fussy cut images to create a nice full arrangement. Adding the layers with spacers helps to keep it from looking busy.
Painted and glittered chipboard snowflakes really adds a lovely texture and great detail.
Santa’s hat was glammed up with Sugar Glitter Paste…because glitter makes everything better : )
The sides and back are finished with the patterned papers.
Now it’s time to fill up the box. I’m adding tissues, sunblock, hand sanitizer, and a hydrating lip balm. This is a great gift for teachers or local postal peeps. I’ve created survival packs for the woman who directs traffic at the school during drop off and pick up times and she really appreciated the supplies. You could also fill the box with baked treats, a small gift, or gift card.
Okay that’s all for me. Wishing everyone a happy and productive day : ) G
Hello there Peeps! Ginny here to share a Christmas greeting card that’s all decked out with altered chippies.
I’m in a very plaid kinda mood this holiday season. I have three here….and believe me that is not a record for me. The chipboard is altered to coordinate. Layering the chipboard adds a lot of depth and texture. There’s a festive little sentiment there too and die cut doily. Adding sequins is the perfect finishing touch.
Please enjoy this process video I’ve prepared for you on how I altered the chipboard….


 Isn’t this super retrolicious?????? This is the Forever My Always Collection from Pebbles.
 Even without the tags it’s pretty dang cute. Anddddd there’s room in the pocket for treats!


