Hello there friends and crafty peeps! Welcome to day 4 of our 13 days of Halloween series on our blog and YouTube channel. Today I’m stepping out of my comfort zone to share a stamped and colored focal image. I’ve been working on my coloring skills and I’m quite pleased at how this pumpkin turned out.
I’ve also gone back to the drawing board from a attempted card layout that didn’t work out for me in the past as I just could not restrain myself to add so many elements on the original card that the graphic pattern and color blocking was lost under to many layers. This time around I dialed it back a bit and I love how it turned out. The are three distinct circular elements not buried under all the stuff .
Although gray is not a super traditional Halloween color it does work here for a more vintagy look.
I’ve even added a large stamped sentiment. This was a bargain bin stamp from Michael’s and I just used a circle die to cut it out.
Coordinating charms hang from a sweet and simple plaid bow.
The gray cardstock borders helps to keep all these patterns from looking busy.
Pretty flowers and die cut leaves create a nice full arrangement when layered with glittery stars and twine bow.
If you like to see the process of making this card please enjoy this video….
If you’d like to catch up on the first 3 days of videos…
Well hello there friends and crafty peeps! Thanks for joining me for day 3 of our 13 days of Halloween series on our blog and YouTube channel. Today I’m sharing a home piece that’s just perfect to add to your favorite seasonal decor.
I’ve started with an embroidery hoop that I finished in flat black acrylic paint.
Steampunk Spells from Graphic 45 is a great choice for Halloween projects as it has loads of holiday inspiration but with an updated color palate.
Gorgeous flowers, die cut leaves, and loopy twine bows are the perfect final touch to this fun and festive decor frame.
Want to see how I created this project? Please enjoy this video….
Hello there friends and crafty peeps! Ginny here dropping in to share a very fun and festive Halloween inspired project created with the fabulous new Land of Wonder Collection and my We R Envelope Punch Board. I really love the look of the tabbed detail so I used it quite a bit through this book.
I am all for non traditional color schemes for the holidays and purple and green are fabulous when paired with black for the book base and die cuts.
The best way to know you will get a perfect match for the flowers on your projects is to make them out of the collection papers. Just use whatever flower die you have on hand and some shaping tools to create coordinating flowers. I’ve layered my handcrafted ones with the BoBunny Blooms and tucked in some small loopy bows of burlap string.
For the focal image here on the cover I fussy cut an image from the cut apart sheet leaving the thick black border then used my Sticky Thumb adhesive dots to pop it up and create depth. There’s a doily here as well cut from black cardstock using the Mandala Doily die layered with a gorgeous butterfly from the Noteworthy Collection, a coordinating brad, and some dots from the matching Thickers.
The brads also work so well in the centers of the flowers. Love the glitter and sparkle!
The inside cover has an additional flap on each side to open giving this mini a mega amount of room to fill up with pictures and journaling. I’ve used the Envelope Punch Board again to create that tabbed detail for the base as well as the patterned papers.
This collection has so many gorgeous journal cards I could not decide so I packed in as many as I could. Creating tip ins is a great way to utilize the entire image and add even more real estate!
For the very inside pages I’ve taken advantage of the patterned paper with larger images on a neutral background to provide room for pictures that can be journaled right on the paper. The inside of the flaps have coordinating papers matted in the cardstock then topped off with image flags from the die cut selection. They are attached only at the top so pictures can be slid underneath for a layered look.
The tip ins all have spacers to provide the bulk needed to retain the shape of the book. The Thickers are so pretty and sparkly and make great page titles.
I always include a clip so that items can be added without adhering them permanently. This way if photos have writing on the back you can access it by sliding it in and out from the clip. It’s also a great place to add mementos.
You can see how all the page flips work together to create a generous amount of room inside to scrapbook with favorite holiday pictures and memories.
Hello there friends and Halloween fans! We are super excited to be sharing the first day of our 13 Days of Halloween series on our YouTube channel.
Isn’t this a charming holiday critter? I super love giant ephemera pieces! Especially when I find them in my own crafty stash.
Even though they are large I’m still stacking loads of them for a very layered look! Speaking of layered……oh yes I did stack the plaids too.
Halloween flowers can be both festive and beautiful….especially when layered with Stickle coated die cuts and altered chipboard accents.
What’s a card without a good bow? Well I’m sure it would still be nice…but more is better in my world so not one but two bows topped with a vintage button.
In place of my usual die cut doily I’ve added a die cut spiderweb. Adding spacers helps to keep the patterns from looking busy.
I’d love for you to check out the tutorial….
You can find loads more crafty inspiration on the Polly’s Paper Studio channel on YouTube.
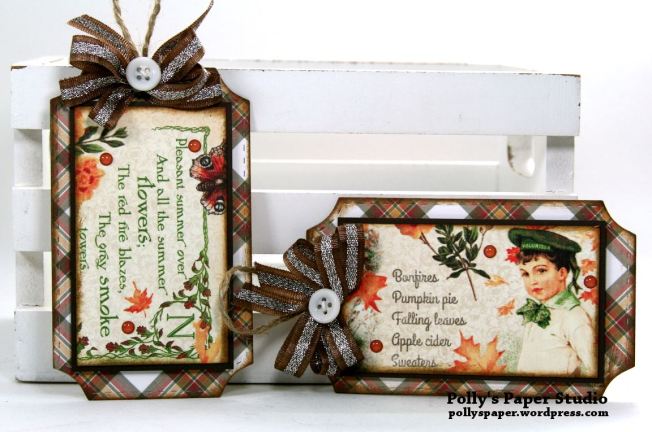
Hello there friends and craft peeps. I’m just dropping in to share a set of tags and cards I created with the paper patterned sheet from Graphic 45’s Children’s Hour. I used the cut apart sheet for my fancy fold card and that left the patterned paper behind : (
I’m quite pleased at how sweet and simple these turned out. And I got all four projects done with the collection sheet, one piece of plaid paper, and one piece of chocolaty colored cardstock. Just add a few card bases and bows and voila!
I used a coved stitched rectangle die to create a frame with the plaid paper and popped it up with spacers to create dimension. Fussy cut images from the sheet create accents for the corner and a loopy bow is the perfect final touch.
With the cut outs from the frame I created two coordinating tags that are great for gifts, decor, or to label a tasty homemade treat. I’m thinking cider doughnuts????
If you like to see how I create the cards please enjoy this video tutorial….
You can find loads of crafty inspiration on the Polly’s Paper Studio channel on YouTube.
Hello there friends and crafty peeps! I’ve got a question for you. What’s better than a fall card? A fancy fold fall card. That is also fun to say! I’m using the gorgeous Graphic 45 Children’s Hour November cut apart sheet for this and of course loads of embellies.
This paper collection has such lovely warm rich colors.
I’ve added flowers and trims that coordinate perfectly.
The clip and eyelet are copper colored and I think it’s just right for pairing with oranges and browns.
Stacking smaller images creates a nice large focal point. Just remember to use spacers between to keep them from looking busy.
This floral arrangement is filled in with loopy twine bows to add fullness and metal spirals creates a lovely texture.
Not only is this card more dimensional….but it provides space to add even more of the lovely images and patterned papers.
To provide space for a sentiment to be added I’ve included a band to secure a tag created with the patterned papers and cut aparts.
Now a sweet thoughtful note can be added and tucked in with this card so the recipient can keep the memories with the card and still share it on display.
Want to see how I created this card? Please enjoy this process video….
You can find loads more crafty inspiration on the Polly’s Paper Studio channel on Youtube.
Well hello there friends and crafty peeps! I’ve got a great Halloweeny project to share today that I had an absolute blast creating. Might be a record for the number of chippies I was able to add. I stared with the Tablet/Phone Stand but instead of using it for it’s intended purpose I’m decorating it up to hold a fun and festive Halloween mini album.
Isn’t this just the most spooktacular addition to holiday decor?
The holder looks just as festive without the book. I super love the vintagy pumpkin.
The cover has a layered frame finished to coordinate with the image and patterned papers.
The base of the book is an ATC Folder which has the pockets already built in! Each pocket holds a tag layered up with the papers and vintage images.
Each pocket also has a folded insert to add loads of real estate for pictures and journaling.
The insides of the inserts have the coordinating papers.
Each insert also has a clip to hold mementos that can be added without gluing them down.
This stand is so perfect for holing the mini album without the worry of it tipping over.
Please enjoy this video share of this Halloween decor and scrapbook….
I’m starting with the Tablet/Phone Stand and the ATC Folder. Wipe them down with a damp cloth to prepare them for finishing. I coated them with flat black acrylic paint. I’ve also got a Doodle Frame Rectangle ready for altering.
The frame needs to be separated to finish. I chose to coat the smaller bits with silvery embossing powder and heated it to set. The inside of the frame is coated in the black paint then stamped with a clear embossing powder and set again. This creates a very subtle effect that’s similar to damask pattern. I’ve clipped the bottom off the Wrought Iron Fence and trimmed it to fit the front of the holder. I’ve also brought in some Mini Petal Corners and a pumpkin from the Spooky Shape Set.
The silver embossing powder works for the fence and corners. I’ve adhered them to the stand then used a metallic paste wax to add a vintgy detail to all the corners. The front of the pumpkin is covered in orange paint and the back has black. I adhered the pieces then used my alcohol markers to add detail. The leaves have green paint. On the finished project I added Stickles to highlight the details.
Hello there friends and crafty peeps! I’m all about the kit today! I’ve created the bestest Halloween deluxe kit with loads of paper pretties and fun holiday embellishments for you to use to get your Halloween craft on! I’ve used the kit and some cardstock and basic supplies form my stash to create these festive projects……
Hello there friends and crafty peeps! Time again for another fun hop with the crew at Really Reasonable Ribbon.
We’re sharing the projects we created with the September Ribbon Club Assortment.
You should be coming to me from my friend Gloria. If you’re just joining in you’ll want to head over to the Really Reasonable Ribbon Blog to start at the beginning.
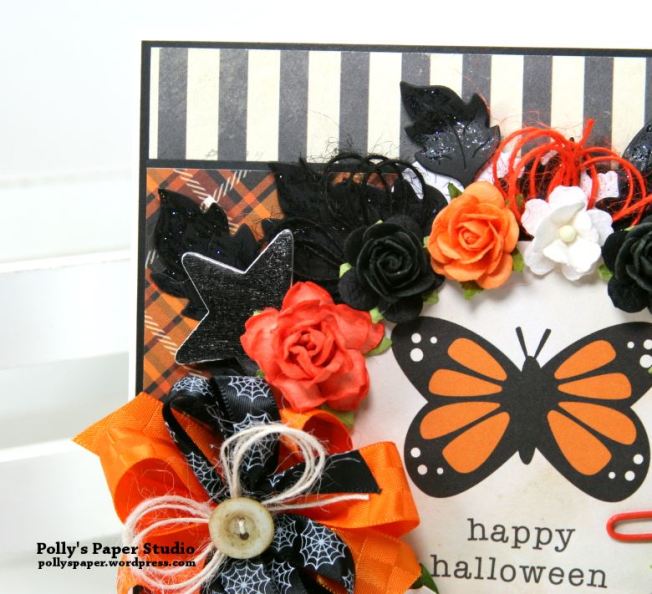
I created a card with just a few flowers. Okay maybe a lot of flowers lol.
I’ve pulled some fabby Halloween patterned papers and layered them up and topped them with a sweet and simple holiday image.
I liked the idea of creating a wreath with some spooky elements.
While I was in a layering mood I decided to stack up the ribbons from the assortment to create an extra poofy bow. There’s twine and a vintage button there and a couple of metal charms in holiday shapes.
To give the wreath a nice shape and to help fill in the gaps I have some die cut leaves in black coated with Stickles for added detail.
Chunky chipboard stars in a silvery finish add sparkle and brighten up the arrangement.
More bows of loopy twine create fullness and gives this wreath some texture. A clip in coordinating color is the final detail.
Hello there friends and crafty peeps! Dropping in to share the projects I created as scrap my stash with a new printable from my shop. I created a collage sheet with images that would work well with just about all my Halloween scraps…..which as you know I do accumulate them fairly quickly when I’m creating lots of mini albums and flip books.
Paper piecing on a shaped background to create a fun decor item then topped with the printed image and vintagy findings.
Creating cards in the A2 size means the scraps can cover the width of the surface. Just find patterns that go together and assemble them on solid colored cardstock. Don’t forget to add fun holiday inspired trims and embellishments.
Dress up a simple tag to use on a gift or label a tasty homemade treat! It’s also a great addition to a vintagy seasonal vignette. Adding Stickles and inking the edges really helps to bring out the details.
Here’s the printable…
For the projects I’ve shown today I printed it smaller than the original so they would be the correct scale.
Please enjoy this process video of how I created the decor tag…